COE installation can be very tricky if there is a lack of preparation. There some key points in this exercise that will bypass a number of limitations and constrains and make this an enjoyable and trouble free experience for the installer.
Lets start!
1.Creating the account needed and assigning the right licenses and roles.
The first and most important bit in this installation is to create an count in AzureAD that has the right privileges and is set in such a way that will not cause issues in the feature. There is a lot of debate in many blogs about using a service account ( an app that acts as a user). Unfortunately it is impossible at the moment. A combination of both can a service account and a user account can fulfill the installation requirements but since a user account will be used anyway the rest just adds up time and effort.
i) Create an account in Azure AD following the guide here and set its password to never expire to avoid unwanted surprises in the feature.
ii) The above account will be used everywhere. At this point we need to assign some licenses for it to be able to install or the required products. The licenses are:
iii) The last part that concludes setting up the User account that will act as the installer is the roles that the account needs in order to successfully complete its tasks. Surprisingly and differentiating from the original documentation we will assign 2 roles:
Concluding the account is now set up. A recommended scenario but not always possible is to grand this account Global admin for the next step. If this is not possible please use an existing GA account.
2. Registering an azure app that will be later used to complete installation
This Step is only possible by using a Global admin account.
If the service account is being granted temporary Global admin, then these steps can be taken by the Service Account.
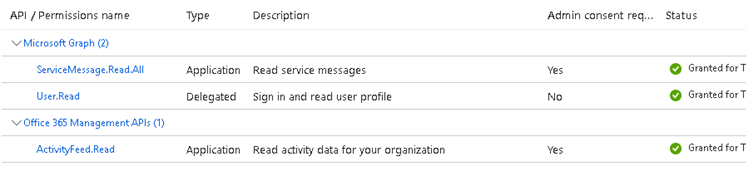
Then navigate to “Certificates and Secrets” and select “New Client Secret” define the description and expiration and select “add”. Copy the following values from the App registration and save them for later:
While being logged in as a Global admin its a good idea to also create three Microsoft 365 Groups. One for each persona of the CoE – Admins, Makers, Users. You will need to copy the Object ID from each group with a note of which relates to which group and save these for later.
3. Set up a Power Platform Enviroment.
Navigate to https://admin.powerplatform.microsoft.com/home and select Environments from the left hand panel. Select New from the top ribbon. Create the environment with the type Production, Select yes for Add a Dataverse data store, and leave the language as English. Do not add sample apps and datasets, set security group to none to avoid any group restrictions later.
Everything needed is now in place for the installation to begin.